Monday, November 18, 2013

Sweet Bonnie by Shwin Designs

I absolutely love testing for Shauna from Shwin designs, her designs are adorable and completely wearable, this pattern was part of the Pattern Anthology winder wonderland collection. 

the first thing I thought when I saw this pattern was AHHHHHH! ZIPPER!!!! After my heart attack subsided, I jumped into this pattern and the zipper was seriously no big deal AT ALL.  the visible zipper was put in, in such a way, that it is completely child's play. I love this top and it took me literally one and a half hours to complete, start to finish, with my children expecting me to actually.... parent.... them.  the collar is just enough vintage to make me happy and it is just loose and flow-y enough to be play worthy that makes my daughter happy.  so here are some pictures!!


Madonna Ruffle Tunic from Shwin Designs

 
A while back I did a pattern for Shwin Designs, one of my ALL TIME favorite designers, and boy, did she hit one out of the park.  it is an adorable slouchy tunic with an adorable ruffle bottom.  I made it with a 4-way stretch knit material, it drapes very nicely, but its a bit heavy for this pattern (because of all the ruffles), at least on the size 2 that I made.  the pattern was super easy to sew up and was very easy to follow.  it would be a GREAT first time knit sew-er project.  so without further a-do, some pictures :)


as you can tell, VERY playtime worthy and she absolutely loves it.  And I have to admit, it goes great with the motorcycle boots she refuses to ever take off :)

Friday, August 30, 2013

Pattern Review: Dandelions n' Dungarees Classic Ruffle Dress


I recently purchased the Classic Ruffle Dress from Dandelions and Dungarees, and boy is it adorable. It comes from a relatively new designer, but the pattern is well written and explained and has great pictures. I expect a lot of great patterns to come from her J

From cutting to completion the dress took me a bit longer than a simple dress- about 3 hours- but most of that was in the cutting… there are A LOT of parts to it.. But don’t be discouraged, it does go together quickly and it is fairly easy (with exception to the *gasp* BUTTONS!!) there were only a few actual pattern pieces, but the rest of the parts (skirt, button plackets, ruffles, waistband, etc) were given as measurements… which in my opinion are SO much better, since printer paper and ink are in high demand around this house. The pattern pieces were very well organized and professionally digitized.

I’d consider the pattern good for beginners/intermediate- only because of the button holes, but you could easily do snaps in place - which are definitely easier. It didn’t have any really difficult sewing techniques. And boy, did it come together nicely. It seriously was the closest to ready to wear (RTW) clothing I found in sizing (normally if I make a 2T for my almost 3y she SWIMS in it. But I took the change and tried (Since it’s the smallest the pattern goes at this point- from what I understand she’s working on expanding the sizes). The only thing I did do to customize the fit of the dress was to do shirring (elastic thread) across the back waistband. It tightened the waist up just enough to fit perfectly.

When cutting the fabric, I also made my skirt pieces 36inches long, instead of the listed length for my size (because I was lazy, and my fabric was already cut to the 36in, why cut it any more… haha) it made the skirt a little more fuller and is just adorable. My daughter loves to spin around in it and swish the skirt. Though, my pattern/measurement alterations were definitely not necessary, actually, this might be the first (maybe even only) pattern that I did not change anything about when putting it together- for me, that is saying A LOT.

And just to let you know the fabric, the print line is called 1001 peeps, I’m not sure of the manufacturer of the fabric, but is gorgeous. My daughter loves the towers on it, she calls it her castle dress.

So in conclusion, you really MUST get this pattern, and all other pattern she puts out in the future for that matter, this is a good one, and is Perfect for back to school. My daughter will be wearing it to her first day of preschool in a few week…… but that’s a completely different post for a different day.


Pattern Review: See Kate Sew- Sugarplum top

 
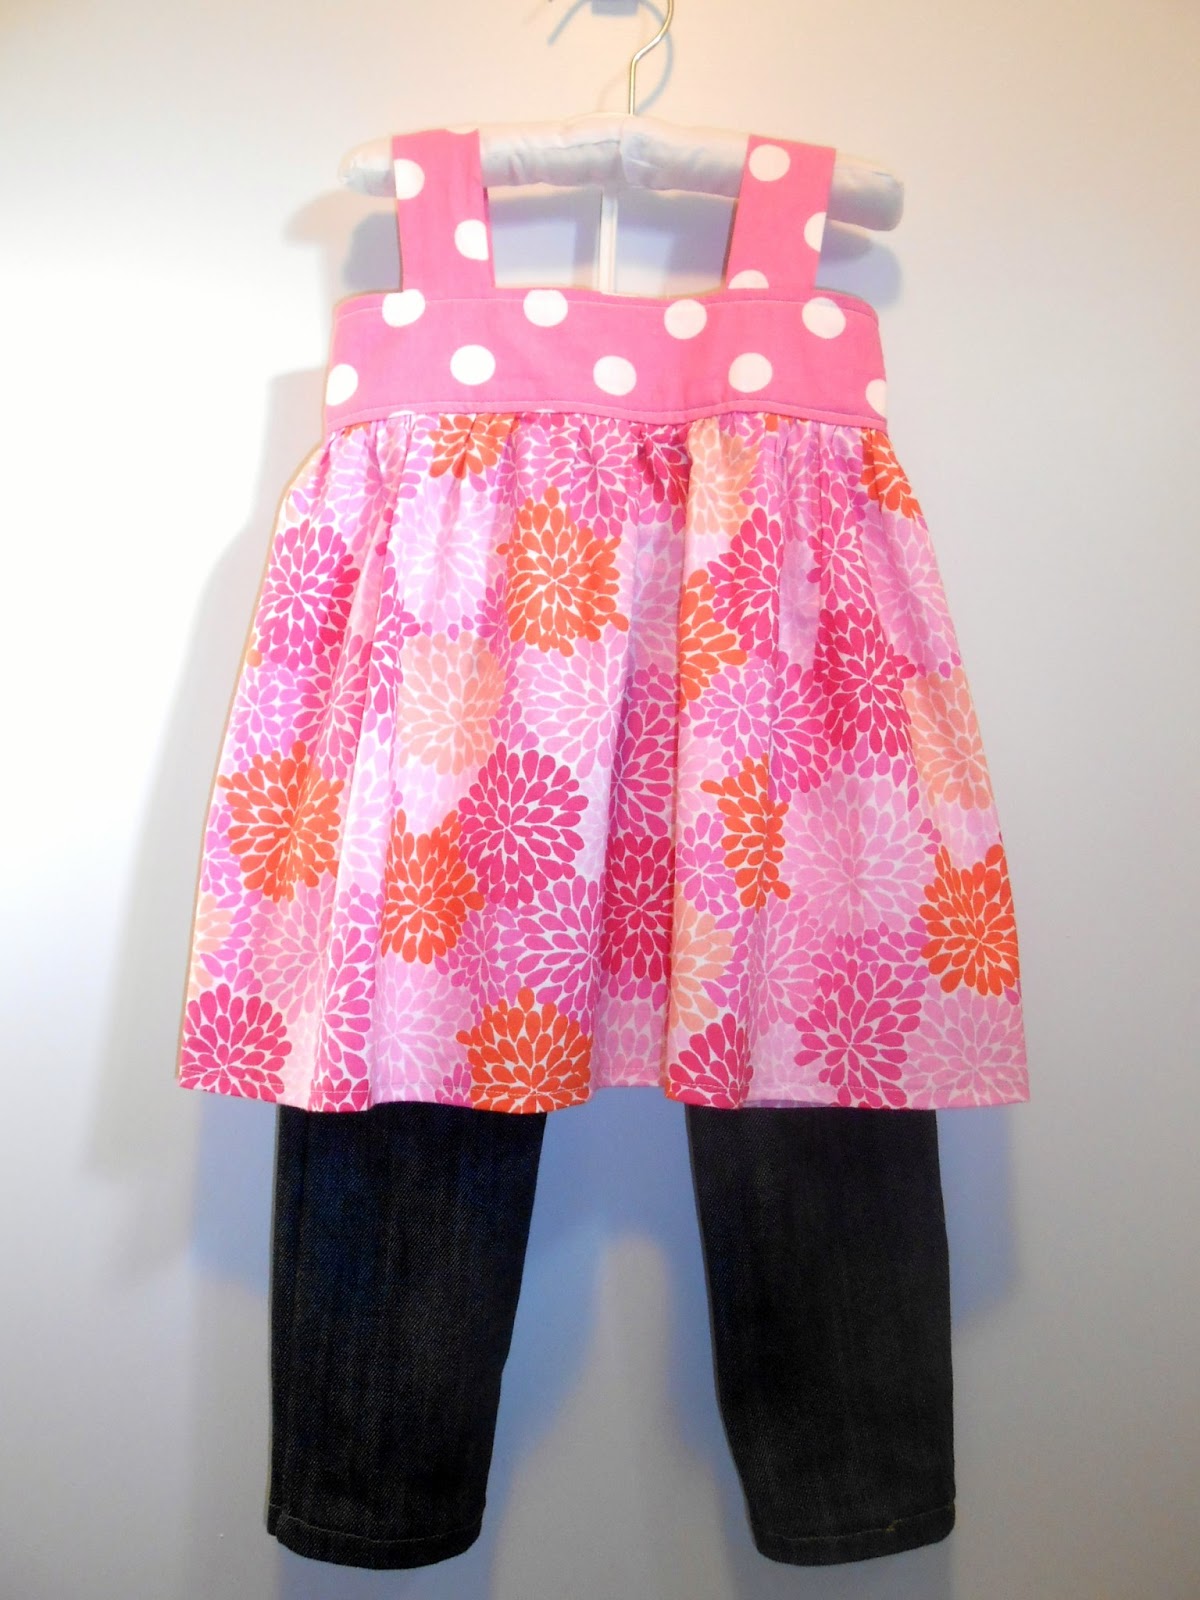
So those who know me, know that I'm fairly well versed in sewing techniques, but I must admit, I’m a lazy seamstress. I love easy projects that don’t call on all my knowledge, one of the many reasons I LOVE this pattern from See Kate Sew. The Sugarplum top is a quick sew and perfect for the beginners out there. There are no difficult closures but it is a very stylish top, which is great because when it comes to easy and quick you’re usually stuck with peasant dresses and pillowcase dresses- though completely cute, are not nearly as fashion forward as this adorable top.
The pattern consisted of pattern pieces you cut out (even the rectangle for the skirt). I loved that the pattern piece for the collar pieces were NOT nested, with a piece that small, I have trouble following the correct line (considering my printer ran out of colored ink months ago). It also included a fuller skirt option to make it more full. From start to finish, including cutting, ironing and sewing, I had this project done within 2 hours, that’s with a rambunctious 2 year old bothering me every 20 seconds. I would say a experienced seamstress could get it done quicker, and a beginner, not a whole lot longer.
 
The only tricky part of the entire pattern was stitching the collar to the lining piece after, it is all attached together- though this could easily be skipped (instead of doing it the way it was written in the pattern, I just topstitched the entire way around the bodice (arm holes and neck opening) I just made sure to flip the collar up when I was topstitching that area (basically topstitching under the collar through all the layers). The top closes by ribbon ties at the shoulders- so easy compared to zippers or buttons. Though admittedly, I did not use ribbons, my daughter doesn’t like ribbons by her neck- so Instead I did plastic snaps (a hit around our house).

The top did fit quite loose on my skinny-mini, I made a size 2t for her, but probably gotten away with smaller, but I was bad, I didn’t go off of the given chest measurements- I told you I was lazy. I just went off of what size she wears “ready to wear” size, which it seems to run a bit bigger than (so yes, MEASURE your child). Though even my mistake was easily fixed. It was super simple to just take in the side seams a bit more than the given seam allowance.
 
I seriously LOVE this top. I have plenty of plans to make more in the future. It would be great as back to school tops in those warmer months. She gives you ideas about changing it up with bigger collars, no front ribbon etc. I plan on trying it next with a larger collar, maybe a big pointed collar as opposed to the peter pan collar. It works GREAT for play time. The only downside for WAHM’s out there, is that the pattern requires a license in order to sell items made of the pattern- but I think the cuteness far out-weight this.
 
I used quilters cotton from the Joann Fabric quilter’s showcase line. I fell In love with this fabric at the store, and a plus, it’s a fairly inexpensive fabric at that. When it comes to fabric choices, I’d stick to a quilters cotton or the like for beginner, but as a more experience seamstress, I’d love to try it out in a silky fabric for an dressed-up, flow-y (is that a word?) finished project.
 
But in conclusion, this pattern from See Kate Sew is A-DOR-ABLE. I’m so glad I gave this new-to-me designer a chance! I’ll definitely be purchasing more patterns from See Kate Sew.

Tuesday, July 16, 2013

Liesel Pattern Review for Peek-a-Boo Pattern shop


I had the pleasure of recently testing the new Peek-a-boo pattern shop pattern, the Liesel Peasant dress and tunic. It truly is adorable. It at first looks like a typical peasant dress, but don’t be deceived, it has lots of details. Instead of being an elastic neck, it is gathered and bound with bias tape. It has a key hole opening in the neck line and a tie closure.


The pattern has several variations such as dress length or tunic, short or long sleeves and the option to put shirring around the waist.

I made a friend’s daughter a nautical inspired tunic with long sleeves and a hand embroidered anchor on it. She absolutely loved it! Even though its 95 degrees outside, she didn’t want to take it off!

I also made my daughter one. She picked out the fabric, an adorable green leaf print from Michael Miller. I even decoded to attempt shirring again- even thought I’ve had disastrous outcomes in the past (and almost trashed my sewing machine in anger). I love how it turned out- which was perfect (probably just a fluke haha). -- And she also loved it too, she begged me to “pictures outside?” after she tried it on… which means she loved it - therefore wanting to model it for pictures.


The pattern sewed up super easy and only took me around an hour to complete. It took just over half a yard for the size 2 for my daughter, and about ¾ yards for the size 10 - both long sleeved.


Verdict: You have got to get this pattern!

Luna Corset Review by Ashley E Designs

I recently pattern tested for a new pattern designer out of the Netherlands, Ashley E. Designs. She designed a cute and girly corset top called the Luna Corset. It was very simple, even with the amount of detail it has and sewed up super quick. It is also a very unique pattern.

It has lots of options: plain front, detailed front, halter straps and lace up back, straps that as used to lace up the back ending in a bow at the bottom. It is super adorable and even comes with a modesty panel to cover more skin. I made one for my daughter with thicker straps, because I don’t like the look of thin straps on little girls. It makes it a lot more modest in my opinion.


It can be paired with a simple tiered ruffle skirt for a dressy look, or some shorts, bloomers or jeans for a more casual look. It is completely perfect for a cute and girly summer look.

It took me around 2 hours from start to finish, which is great, because of all the ruffles, I expected it to take double that.

Verdict: take a chance on this new designer. You will not be disappointed.


Wednesday, July 3, 2013

Pattern Review: Delaney Tunic/Dress by {Sig}nature Creations


I recently folded to the peer pressure and purchased the {Sig}nature Creations Delaney Tunic/dress pattern. I’ve been seeing it EVERYWHERE lately, it’s the new “hot” pattern. And truly it did not let me down, I made one fore my daughter and it is stinkin’ adorable!

It was super easy and definitely someone with beginner skills could figure it out, there are lots of helpful pictures in the tutorial of how it’s put together. It is also a super quick project so if you’re like me and decide you’re little girl needs a new outfit the day you need to be at a party/special trip/ whatever, you could definitely get it done super quick. It took me about an hour from picking fabric to cutting and sewing. And seriously I just LOVE how it turned out.
If you are super crafty (and good with pattern drafting, based on measurement) you probably don’t NEED the pattern, basically you are given the measurements for the parts, because they are all rectangles. I know I can, but If you’re sewing for a boutique (like I plan to in the future) its definitely worth the investment, since it has the measurements for the pieces for sizes 0-6m all the way to size 8 (and she even just released a second Delaney pattern for sizes 8y to 16y (so all the way up to almost adult sizes!!!).


I finished it differently than the pattern is intended, my daughter isn’t thrilled with bulky bows on her back, so I extended the band and added snaps in the middle, but, next week, I hear, she’s going to be releasing the add on pattern, which gives 3 more ways to finish the closures, a different type bow, a button closure, and a lace up closure. All of them look super cute and my daughter will be getting more in each closure one I can pick up the pattern.


So final verdict: GET THIS PATTERN! Its seriously adorable. And versatile enough to be worn all year round, summer without anything under, and fall/winter/spring with a shirt under like an apron/pinafore.
(shown with the Skinny Jeans from Peek-a-Boo Pattern Shop)

Tuesday, June 18, 2013

Jessica Halter top Tutorial for 18in dolls

A few months ago, we were cleaning out my attic in order to make some room for a craft room for myself sometime in the future…. Probably after it stops being 105degrees up there, because without air conditioning, I couldn’t even bribe my (very helpful) husband to assist me with it. It needs outlets put in, flooring and walls… so just about everything. When I was up there with my daughter, she found my old American Girl doll from... ohhhh 20 years ago, haha. It was the original Molly, and line my irresponsible childhood, it only had one of the outfits (out of the say 10 my parents had bought me). But Mags was hooked! She’s been carrying it around everywhere ever since. She asked me one day for a dress for her and I started looking around for free patterns, to find… there aren’t all that many. So here is my first in a series of completely FREE American Girl (18in) doll patterns this is the Jessica Halter top, its paired with a pair of simple leggings, I’ll post the pattern/tutorial for those tomorrow Enjoy!

What you’ll need:

15x7in scrap of fabric
2 pieces of 1/4in elastic, 10inches long each
18 inches of ribbon

Start by laying the piece of fabric right side down and along the long side, draw a line along the legnth 3inches from the top, the mark at the center of that line
On that line, tack down one of the pieces of elastic at each end of the fabric. 
 
Pulling the fabric flat (stretching the elastic) use a 3 step zig-zag (the zig-zag that looks like its dotted) stitch down the center of the elastic (keeping the stitching on the elastic)
 
Fold the piece of fabric in half width-wise and stitch a seam to make a tube out of the fabric

Fold down the top length of the fabric piece 3/4in and run a line of stitches right along the fold all the way around, then another right below that 3/8in away from the last row of stitches. Leave about a 1 inch space open in this stitching.

Using a safety pin, thread the second piece of elastic through the casing, attach the ends of the elastic together and tuck that back into the casing. Close the hole you left open in the stitching.

Find the center point you marked. Lay the ribbon perpendicular to the lines of stitching, with the center of the ribbon at the bottom row of stitching of the elastic casing. Tack down the ribbon by stitching over it on keeping your stitches on the line of stitching below it.

Hem the bottom of the halter and you’re done!!! Tomorrow I’ll post the tutorial to the legging that make a perfect pairing with this adorable summery halter