Thursday, August 2, 2012

A Quick (and cheap!) Outdoor Update

I love my house. a lot, it’s a 1950’s cape cod style house, and its adorable. I have an awesome front porch with a cute porch swing that we use all the time. The exterior of the house is a unique red brick with mix of black bricks thrown in every now and then. I looooove the bright red brick, I hate those weird orange brick houses, and wouldn’t know the first thing about painting brick houses, so I’m glad I lucked out.


Anyway, the outside of my house, even being as cute as it is, is a bit boring. I have all these ideas to change the look of the front, but, I’m tired, I have a toddler (who loves to “help”) and am pregnant, so I need a quick and easy project to appease me. I’ve always wanted to have a bright colored front door, but never knew what color to go with, I was so worried that it would be the wrong color, so in turn, I just let my boring white door stay. After a while I seriously became fed up with it, so I decided to act. I had this idea that a light blue would be a perfect color, it wouldn’t fade in, but it also wouldn’t be too… weird. I did buy a back up plan- charcoal, and also had left over white, from another project. But after finishing up the one coat of blue, I seriously FELL IN LOVE! (I went on to finish a couple more coats, obviously) but I didn’t need the extra colors, this one was perfect. And even better, the entire project cost me only 6 dollars! I bought 2 jars of the paint samples from lowes, I probably should have bought the exterior paint, but seriously, that would have cost ATLEAST twice as much, I’m cheap. I figure that with the storm door, its not going to be getting the rain, so I didn’t have to worry so much. In a year or two if I’ve changed my mind paint is easy to cover up. So here it is! voila! Don’t you just love it!


Next up on the front porch, getting rid of the HIDEOUS grey indoor/outdoor carpet on the front steps!

  Enjoy!!

Tuesday, July 31, 2012

Snappy Baby Romper


I love this little number. I'd also be lying if it wasn't inspired a bit by the Snappy Toddler Top from Prudent Baby, which is also one of my favorites. Though, with this i made a thicker neckline yoke, which i prefer the look of, but seriously, who wouldn't love a baby in this outfit!!!
To make this, I used an old sheet I had, which I love, i've used it for other projects, and have a lot left still!


You'll need :
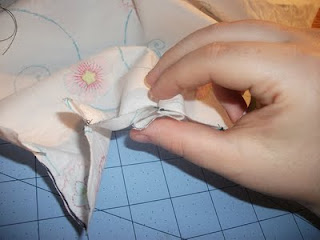
approximately 3/4 yrd fabricapproximately 20 inches of elastic 7 snapsThe Pattern -print at 100% (or no scaling) for 12-18m, make it a bit longer for a larger, then at 90% for around 6m, around 80% for 3m.  i'd just play around with it to make see what you need. though at almost 2 my daughter still fits this one i made for her at around 8m   using the front body piece, fold the middle with wrong sides together and match up the pleat lines, do a few stitches to tack this pleat. Then do the same with the two outer pleat markings on each side, this time folding and matching up the pleat lines with right sides together. Your front top will look like this.


split center with the center front pleat loop and pin Fold the outer pleat loops toward the middle, pin.
Using the back body piece, both back pleats will be done the same, fold and meet pleat lines with right sides together. Do a few stitches to tack the pleat. Fold the pleat loops toward the center of the body piece, pin.
On both front and back body pieces, baste across the top at a 1/8th inch seam allowance to fix the pleats in place

For the front and back yoke pieces, there are 2 different ways you can complete the circular necks for both the first step is the same; starting at the markings, back stitch and stitch towards the outside of the yoke, around the top and finish (with a back stitch) at the other mark.
The first way, you can clip the curves, flip it and fold/iron under the edges. The other way would be to complete it the same way that in the previous post, basting across most of the opening, clipping the curves, turning and ironing. Then seam ripping the basting edge, leaving a neatly folded over edge. Do this for both the front and back yoke pieces. 
Taking both front and back body pieces, stitch them together on both the sides at a 3/8th inch seam.


Fold and iron the seam flat- for this I usually use my handy dandy flat iron that I’m too lazy to use on my hair.


Hem the leg bottoms by folding it 1/4inch and iron; then 1 inch and iron. Make one row of stitches just under the hem amount. About 7/8 inch seam allowance, then again at 1/2inch seam allowance from the bottom, under it.


Measure around the baby thigh to get the length of elastic needed per leg hole. Using a safety-pin lace the elastic through the casing we just made, tacking it down at each opening.

To finish off the arm holes, apply bias tape around the edge, I usually prefer home made, since it’s A LOT cheaper and comes in prettier colors when you get to choose it. But I had a little left over bought stuff, so I just used that instead. Visit Dana Made It Blog for a tutorial on making and sewing bias tape.

To apply the yoke to the body pieces, insert the body piece into the appropriate yoke open that we seam ripped. (front with front, back with back). Make sure there is about 1/2inch of the body piece inside the yoke.


Pin.Stitch across the opening to finish the top at approximately a 1/8inch seam allowance. Stitch around the entire yoke at this seam allowance. Do the same for both front and back yoke pieces


To finish the bottom of the romper, use inseam lining pieces. Take two of the pieces and line up. Stitch around the edges at 1/2inch seam allowance.

Clip the curve. (for this, I much prefer using my pinking shears, cutting close to the line of stitches. It provides a quick and uniform clipping).

Flip it inside out and iron. Do the same at the previous 2 steps for the remaining two inseam lining pieces.

Line up the inseam lining pieces with the unfinished bottom seam, there will be hang over on each side. The pieces should be lined up on the right side of the fabric. Pin.


Stitch the inseam at 1/4inch seam allowance. Clip the curve.


Flip the lining to the inside of the body piece. Iron and stitch at 1/2inch seam allowance.


Apply snaps to the inseam area.


Apply snaps to each of the shoulders. And we’re done!!!
.
Here are a few action shots of mine on Baby:


It is Well with my Soul Printable


“It is Well with my Soul” is a very important hymn to me. I always loved it in church, but when my mom passed in May of 2011, it gave me the strength to move on for myself and my family, especially my daughter. She was my best friend and when I lost her, it was like losing the world. This hymn refers to 2 Kings 4:26, the meaning behind the hymn is a story of a Shunammite woman whose son died but was restored to life again because of her faith in the Lord. It is about dealing with loss, I hadn’t realized that, until I listened to the lyrics of it closer. But it can relate to the rest of life too, such as when your life is a mess, you can be well within your soul, if you ask the Lord for the help. I made this printable/poster, for about my mantle to remind me of this ever day.


I love the look of this printable, I LOVE how it looks on my mantle, but who wants to spend upwards of 30-60 dollars on one off of Etsy.com or the like. I made this poster for around 10 dollars. Seriously. And I’m talking EVEN the frame. It is just a cheap 18”x24” poster frame, I got mine from Joann Fabric for $7.49 (it was on sale 50% off) but sign up for their coupons, they ALWAYS have coupons, I actually use the mobile app, because I forget to carry the coupons, but ALWAYS have my cell phone. The print was really cheap too, I took the printable I designed, on a flash drive, to FedEx/Kinko’s and had it printed to fit my frame, they did all the hard work of resizing and EVERYTHING, and on top of that, it only cost $2.49 for the print.


I put it into the frame and arranged the rest of my mantle around it. And I have to say, I’ve fallen in love with it. And you can do it too! Here is a link to the printable, feel free to use it as you wish (but pretty please, don’t sell it yourself). Enjoy!


Wednesday, June 13, 2012

Hello! Welcome to our CRAZY house! This is my first post on this blog, so I just wanted to let give you a little introduction to myself J I am a 27 year old mother of one, soon to be two, due in October with a little boy. I have a crazy 20 month old daughter who keeps me on my toes with her crazy antics and her adventurous spirit. With her around, nothing is ever boring. I’m a stay at home mom for now who loves to be crafty, cook, and entertain. I’m the owner, operator, designer, extraordinaire of Ark Cloth Diapers and also the owner of sewbynightdesigns.blogspot.com -which instead of updating, I’m just opening a new site, I have lots of interests, and that only spotlighted one of them, which was my sewing. Here you’ll be able to see my sewing, and cooking, designing and diapers all rolled into one, including a look into my life as a stay at home mom.

I’m going to kick start the blog by reposting some of my popular post (mostly sewing project tutorials that people loved) from my other blog. Enjoy!!